
Style Tips
How to do eyeliner for beginners in 2024

An essential part of our beauty regimens is eyeliner. There is just no cosmetic look we can’t finish without liner, from the most creative graphic looks to a soft flick. It’s a simple technique to draw attention to your eyes, lengthen your lashes, and even awaken your appearance. Of course, it takes practice to perfect a tightline or cat-eye. However, don’t worry if you’re just getting started and have never used eyeliner before. We have a tonne of ideas, tips, and tactics that can help you quickly become an expert at applying eyeliner.
How to do eyeliner for step by step
Step 1: Select your favourite Eyeliner
Pencil, gel, and liquid are all excellent options, but each has a unique use and skill level. The simplest to use and ideal for a daily appearance is the eyeliner pencil. To get a thin, accurate line, just remember to sharpen your pencils on a regular basis. Usually, gel eyeliner is applied with a brush and comes in a pot. These can be more difficult because you have to measure out the exact amount of stuff to use. Gel eyeliner pencils, on the other hand, combine the smooth application of a pencil with the intense, saturated colour payoff of a gel. The liquid category includes the most sophisticated liners. Liquid eyeliners are unmatched for producing dramatic eye shapes like cat eyes once you learn the delicacy required for perfect application. For our picks of the best eyeliners for beginners—pencils, liquids, and gels.
Step 2 : Prime Your Lids
An eyeshadow primer will prepare your lids and produce a smooth, even basis for your eyeliner, no matter what formula you choose. We enjoy the Urban Decay Eyeshadow Primer Potion because it keeps eye makeup pigmented and crease-free for the whole day.

Step 3: Draw the Line Near Your Lash Line and Thin
Make sure to apply your eyeliner precisely against the lash line when drawing it. Having your base down initially aids in creating a thicker line, but you can easily build it up afterward. Try making the line as thin as possible at the inner corners of your eyes and progressively widening it as you approach the outside corners to make your eyes appear longer.
Step 4: Remember to Blend
For a more natural look, blend out any eyeliner pencil that you may be wearing. This is much easier to do using a dual-ended pencil that has a sponge attachment at the end, but you can also use a smudger brush or your finger to blend your liner. Your line will either be entirely smoked out or slightly softened depending on how much pressure you apply.
Step 5: Use a Cotton Swab to Correct Errors
Don’t worry if you made a mistake; it occurs to everyone. Rather of beginning from scratch, use a cotton swab dipped in micellar water or makeup remover as a gentle eraser to eliminate any mistakes. Just keep in mind that erasing eyeliner while it’s still wet is simpler and less messy than doing it after it dries.
Different style of eyeliner
1. Traditional Wing Liner
The traditional winged liner is an ageless option that never fails to draw attention. It instantly amplifies the drama and elevates your appearance with its sophisticated flick that extends from the outer corner of your eye. For clean, precise lines, use the best liquid eyeliner and a fine brush or felt-tip applicator. Depending on your desire, create a thin or thick wing. Then, apply mascara to achieve a gorgeous cat-eye look.
2. Linear Graphic
The best option for people who enjoy experimenting with striking and edgy styles is graphic liner. You can experiment with forms, angles, and lines in this style to produce distinctive and striking designs. Let your imagination go wild with geometric forms, double lines, or graphic cut creases. To guarantee accuracy and durability, go for a waterproof liquid eyeliner with a thin brush or pen-like tip.
3. Smeared Liner
Your eye makeup looks sensual and smokey when you use a smeared liner style. Line your lash line with a waterproof eyeliner pencil, then use a cotton swab or smudging brush to softly blur the line. This method intensifies the colour of your eyes by giving them a softer, more blended appearance. Apply a lot of mascara and a neutral eyeshadow to create a striking, smoky-eyed look.
4. Vibrant Liner
To give your eye makeup a lively touch, explore useing coloured eyeliners instead of sticking with the classic black colour. Select colours that go well with your skin tone and eye colour. Your eyes can become the centre of attention right away with a waterproof liquid eye liner in rich colours like deep blue, emerald green, or purple. For a dramatic and whimsical appearance, apply a small line at the lash line or go for a full-on multicoloured wing.
5. Liner with Two Wings
By including an additional flick on the inner corner of the eye, the double winged liner elevates the traditional wing to a new level. For neat, symmetrical lines, use a long-lasting eye liner applied with a precision brush or pen applicator. Try varying the lengths and angles until you achieve the ideal double winged style that complements your eye shape.
6. The Floating Liner
Floating liner is a cutting-edge and contemporary look that gives the appearance of floating lines above the eyelid crease. Make a thin line on the eyelid or just above the crease, making sure to leave a tiny space between the liner and the lashes. This unique style adds an element of surprise and attracts attention to your eyes. Pair it with minimal makeup and thick lashes for an ethereal and futuristic look.
7. Sparkle Liner
Glitter liner is the best option for giving your eye makeup a glamorous and dazzling look. Select a liquid eyeliner that has small glitter particles and lasts well. For a stunning appearance, apply it over your normal liner or make a sparkly wing. The shimmering embellishments draw the eye and captivate it completely. Make sure the glitter particles are safe for the eye area and use an oil-based makeup remover to gently remove them.
Why is eyeliner a necessary component of makeup? It looks excellent on almost everyone and can modify the look subtly or significantly depending on how you apply it! Although using the eyeliner approach could appear challenging at first, we’ve included a guide to help you look flawless. I did explain when to use liquid gel, cream, and pencil eyeliner, as well as provide step-by-step directions for applying each technique.

Are you trying to decide what to wear for your next party? You only need to Some party hairstyles look at our carefully chosen collection of gorgeous party hairstyles for women. For every event, we have options ranging from sophisticated updos to gorgeous waves. At your next occasion, make a statement and draw attention with a hairdo that accentuates your features and expresses your individuality. Our guide includes all the necessary alternatives to elevate your look, suitable for both short and long hair.
Some party hairstyles look
1.Fishtail Ponytail
The fishtail ponytail is a more sophisticated version of the traditional high ponytail, ideal for dressing up or down as the holidays get closer. This is ideal for you if you’re the kind who enjoys keeping your hair out of your face. possess medium-length or short hair.

2.Half-Up Half-Down With A Twist
Searching for a stylish yet simple hairstyle? Try the Twisted Half-Up Half-Down. This contemporary interpretation of the traditional look is ideal for a romantic date night or any semi-formal event. It creates a beautiful and carefree hairstyle by fusing the whimsical charm of twisted pieces with the simplicity of a half-up, half-down style. Here are the quick and easy ways to get this look.
3.Elegant Bun
Want to seem put together but are pressed for time when getting ready? Try making this sophisticated bun—it just takes two minutes! You can easily achieve this style with a few twists, turns, and bobby pins, even though it appears complicated.

4.Braided Crown
Try the braided crown hairstyle for a chic and striking look for formal occasions or weddings. This haircut draws attention to your lengthy hair and gives your whole look a hint of refinement.
5.For short hair, try a topsy-tail half-updo
Even though it looks complicated, all it takes to pull off this party hairstyle is a few twists and turns. Twist two hair pieces on either side of your head, then bring them together in the center. Next, place another little ponytail beneath the pre-existing hair elastic. Divide the portion in half, then insert the remaining bottom section of hair into the small opening you just made. This completes the look.

6.Bob the waterfall
For individuals who like a short, low-maintenance hairdo, the waterfall bob is a stylish option. Little styling is required to obtain the lovely, layered look that the hair’s cascading effect creates. This hairstyle is a flexible choice for anyone searching for a new haircut because it flatters all face types and hair textures. It’s also a fantastic method to give your hair some movement and structure without making a big impact.

How should my hair be styled for a party?
Using a hair tie, pull all of your hair up into a very high ponytail on top of your head. Separate the ponytail’s loose ends into two parts. To form a knot, wind them around one another. To secure the style, use hairpins, and then apply a generous amount of GHD final fix hairspray.
Which haircut complements a party dress?
If the dress is off-the-shoulder, consider a classy low bun; if you’d rather not show off too much, you may always let your hair loose and curl it for a lovely appearance. Choose low buns if it’s a boatneck or jewel neck. You’ll always appear lovely with low buns.

Ladies who are fashion-forward, take note! Are you prepared to update your clothes to reflect the newest styles? Are you a lady who constantly wants to be on top of the newest trends and is fashion conscious? If so, you’ve arrived at the ideal location. These are the are the best 5 stylish tops for women. Great on you whether you’re dressing up for a night out or down for a laid-back day out.
Best 5 stylish tops for women
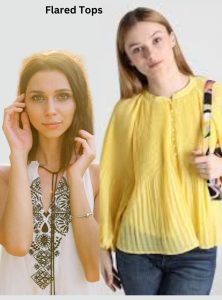
1. Flared Tops
Better than ever, flared tops are making a comeback. For individuals who like a little drama in their clothes, these tops are ideal. Their patterns and fabrics range from vibrant blooms to subdued colors. For a stylish look, flared tops go well with high-waisted trousers or skirts.
2.Tunic Tops
Loosely fitting garments that fall to the hips and resemble an Indian Kurtis are known as tunic tops. Depending on the material, tunic tops can be worn for formal or casual occasions. You can experiment with wearing it with skirts or denim to show off your style. Tunic shirts offer a stylish and carefree appearance, whether you’re dressed up for a laid-back day at the office or need a comfortable wardrobe for work. They come in an assortment of materials, hues, and patterns and go well with leggings, jeans, or skirts to create a whole look. Learn about the newest fashions, hairstyle advice, and essential tunic tops to add to your wardrobe.

3.Off-Shoulder Tops:
This summer’s newest fashion is off-shoulder tops, which are similar to ruffle shirts. This top looks great with straight or flared jeans, but it also looks great with skirts and shorts in the summer. Off-shoulder tops provide you countless options for stylish and figure-flattering ensembles, regardless of your preference for flowy, bohemian looks or sleek, fitted silhouettes. Discover the newest styles, how to style, and how to get the most out of this classic piece of clothing.
4. Kaftan Tops:
If you enjoy a little bohemian flair in your attire, kaftan tops are ideal. These tees are ideal for a laid-back day out because they are airy and comfy. They are made of different materials and prints, such as paisley, floral, and tie-dye. Wear them with leggings or denim shorts for a nice and laid-back style.
5.Peplum tops:
These are women’s tops that help disguise the protruding area around the stomach by having flares around the line. Both pear- and apple-shaped bodies fit well with plum caps. Peplums look stunning when paired with pencil skirts and straight trousers.

What kind of top goes best with jeans?
Get the Look You Love With These Chic Tops To Wear With Jeans. Select the appropriate fit: When wearing a blouse with jeans, its fit is crucial. A crop top or form-fitting shirt can look fantastic with skinny jeans. You can wear a tunic or a looser-fitting blouse with pants that fit more loosely.
What girls can wear under the top?
A t-shirt bra should be your go-to item in your knickers collection. A modern woman can wear it as an everyday accessory with shirts, blouses, dresses, and all sorts of clothes.
Use eye makeup to draw attention to your eyes and improve the way you look overall. Knowing the fundamentals of eye makeup is crucial, regardless of whether you want a dramatic or natural appearance. This post, How to Apply the Best Eye Makeup, will walk you through the process of applying eye makeup step-by-step and offer valuable pointers and guidance to help you hone your skills.
How to apply the best eye makeup
Washing your face:
Cleaning your face earlier, cleansing your face is an important first step in applying eye makeup. Use a mild facial cleanser to remove any makeup residue, dirt, and excess oil. Be sure to rinse your face thoroughly with water and pat it dry with a soft towel.
Moisturize skin:
Leaving the area around your eyes hydrated is a crucial step in applying a decent foundation. This keeps the skin moisturized and supple, which facilitates even application and longer wear of makeup. Apply an eye cream made especially for the delicate skin surrounding your eyes, and use your fingertips to gently massage it in.
Putting on primer:
It’s time to put on a primer after washing and moisturizing your face. Using an eye primer extends the wear of makeup and keeps it from settling into creases and fine lines around the eyes. Using a brush or your fingertips, thoroughly apply a small amount of primer to your eyelids.
Start with excellent makeup brushes:
It’s far more difficult to produce a masterpiece without the right instruments, which is why well-known artists don’t finger paint. This also applies to applying makeup. Invest in a few high-quality makeup brushes for consistent, accurate, and sanitary makeup application. Fortunately, excellent ones are available without spending your whole salary.
Apply a base eyeshadow to the lid:
Using your eyeshadow brush, select your preferred base shade from your eyeshadow palette and sweep it across your eyelid. In order to achieve a more dramatic smokey eye, you can apply this base colour all the way up to your brow bone; alternatively, you can stop at the crease of your eye for a more subdued, daily look. Here’s a tried-and-true tip for the latter scenario: apply the colour in the crease of your eye while it’s open and work your way down to the lash line. In this manner, you can avoid overshooting your crease and having clumsy lines.
Concentrate darker shadow in the crease of the eye:
Since dark hues reflect light, adding precisely the appropriate amount of depth and dimension to the crease of the eye helps your eyes stand out. Using a dark shadow, dip the blending brush into the eye socket and move it in a straight line, following the contour of your eye between the brow bone and the eyelid. Regardless of your eye color, a deep brown eyeshadow is a universally attractive choice. When your eyes are open, the majority of your movable lid is hidden by your upper lid if you have hooded eyes. This implies that if you apply crease shadow along the eye socket, it will not show up when you open your eyes; therefore, you will need to experiment with higher, different positions. Rather, begin with your eyes open and indicate with your brush where you want the dark color to begin so it will be visible. Then, with your eyes closed, blend across, blending out any harsh edges and concentrating pigment in the shape of a “V” on the outermost corner of the eye.
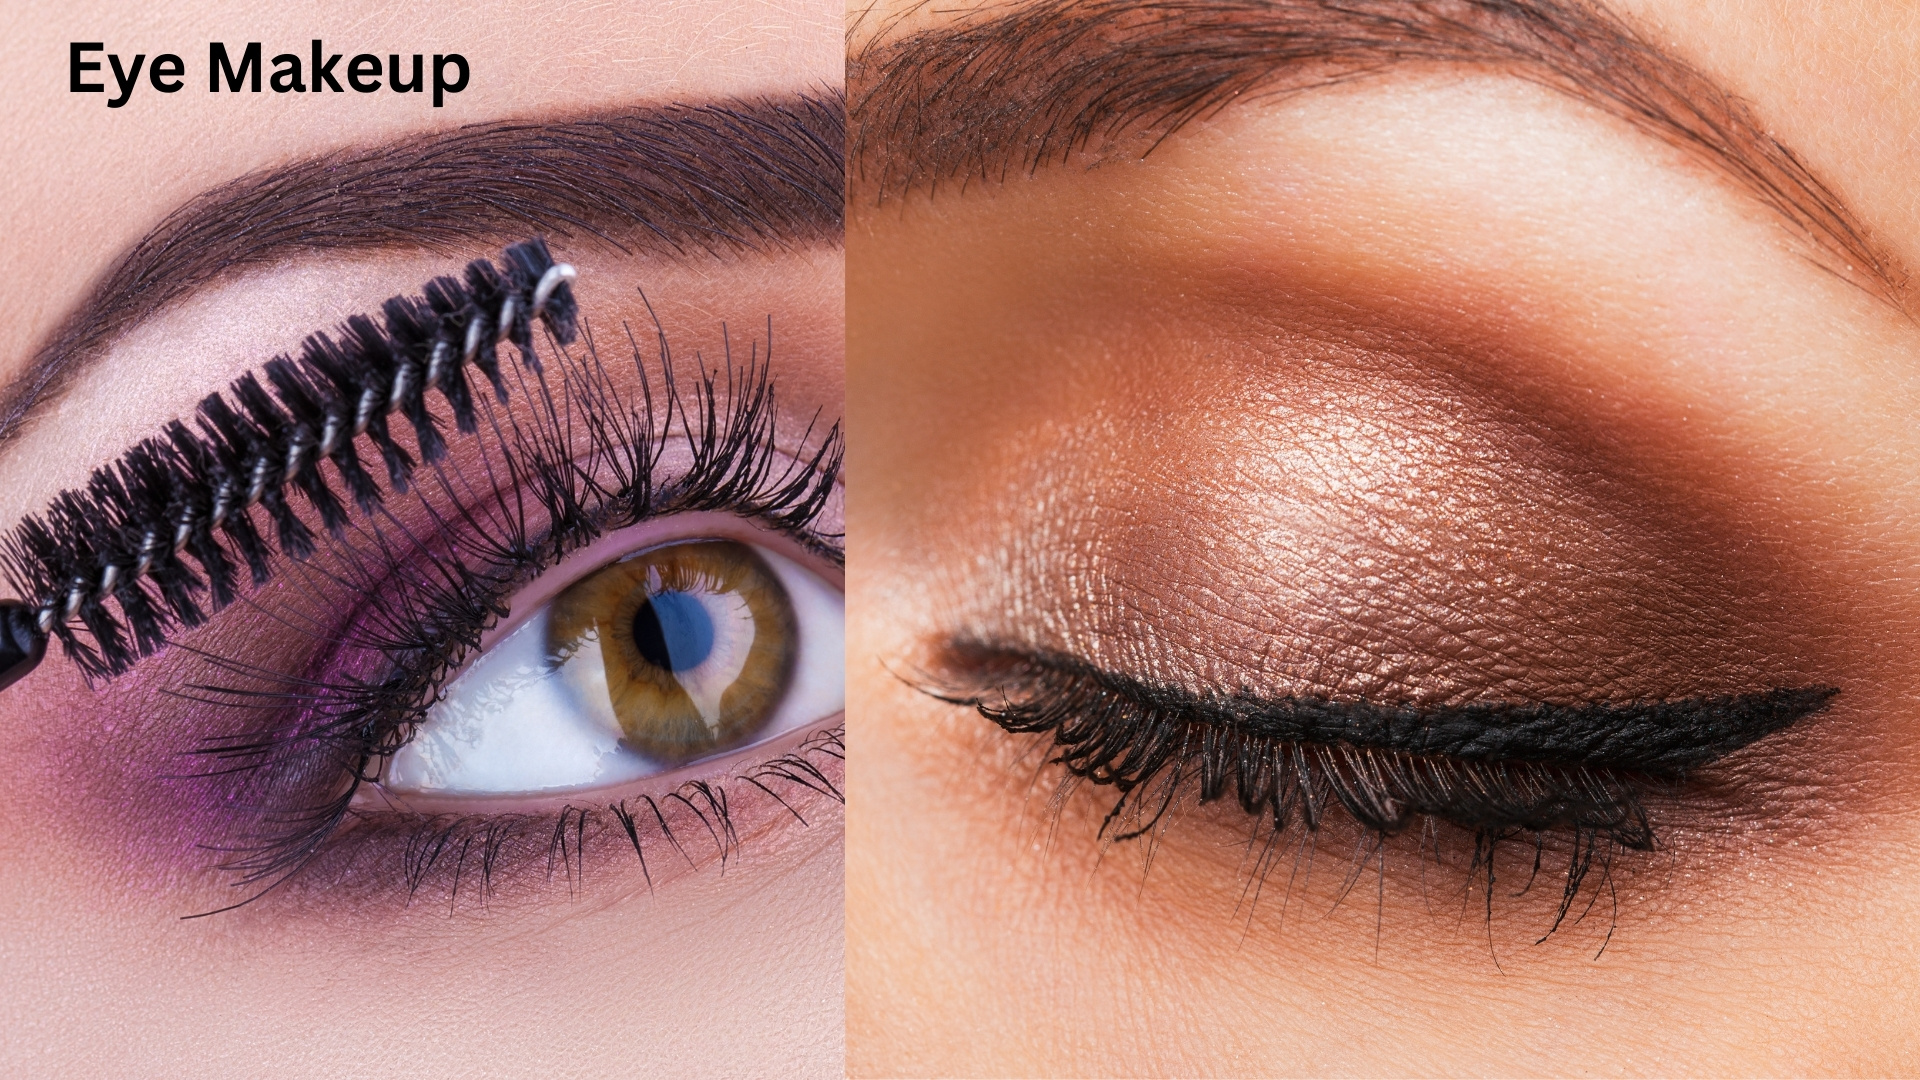
Apply a super-dark color to the rims of your lash lines:
Properly applied eyeliner can give the illusion of fuller lashes. If eyeliner isn’t your thing, there are other ways to achieve a similarly striking appearance. Press the dark color along the lower lash line and the borders of your upper eyelid, where your lashes start, with a short, flat brush. The bristles may irritate your eye if you enjoy using liner on the innermost rim of your eyes, known as your waterline. then you can use a waterproof eyeliner to trace this line.
Using mascara:
Mascara gives the appearance of longer, fuller lashes. To achieve a more open appearance, begin by using an eyelash curler to curl your lashes. Next, work your way from the roots to the tips of your lashes by applying a layer of mascara. If preferred, repeat this procedure, letting the mascara dry in between layers. Use a mascara with a volumising formula if you want to give your lashes more volume. Your lashes will appear fuller with this product.You can also use brown mascara in place of black mascara if you prefer a more natural look. Your eyes will appear softer as a result. For a more defined appearance, you can also delicately touch up your lower lashes with a little mascara.
Eye makeup name list

- Eyeliner
- Concealer
- Crease Brush
- Highlighter
- Eyeshadow
- Eyebrow Pencil
- Eyeshadow Palette
- 24-hour eyeliner
- Mascara
- Lasting smooth eye primer
Now that you know how to apply eye makeup flawlessly, all you need is a beauty mirror for maximum accuracy and experience. The greatest makeup mirrors have LED lights that last a long time to help you perfect every aspect of your appearance. Finish applying your makeup.

ক্র্যানবেরি জুসের প্রধান স্বাস্থ্য উপকারিতা

কি খেলে ইমিউনিটি পাওয়ার বাড়বে

প্রোটিন কেন গুরুত্বপূর্ণ

রোজা রেখেও শরীর দুর্বল হবে না

যা সেহেরিতে খেলে পিপাসা কম লাগবে

ইফতারে কী খাবেন, কী খাবেন না

থানকুনি পাতা চুলের জন্য অসাধারণ উপকারিতা

আখরোট ব্রেন টনিক কাজ করে

চোখ ভালো রাখতে চোখের ব্যায়াম

দিন দিন ত্বক রুক্ষ হয়ে যাচ্ছে?

রোজা রেখেও শরীর দুর্বল হবে না
যা সেহেরিতে খেলে পিপাসা কম লাগবে
ইফতারে কী খাবেন, কী খাবেন না
থানকুনি পাতা চুলের জন্য অসাধারণ উপকারিতা
আখরোট ব্রেন টনিক কাজ করে
চোখ ভালো রাখতে চোখের ব্যায়াম
-

 Lifestyle8 months ago
Modern stylish abaya in 2024
-
 Style Tips10 months ago
Sunglasses for All
-

 Beauty Tips8 months ago
5 easy tips for doing manicure at home
-

 Beauty Tips9 months ago
The Advantages of Ice facial
-

 Beauty Tips9 months ago
How to keep your hair beautiful and healthy.
-

 Fashion8 months ago
The Best 5 Elegant Abaya Dresses for Every Occasion in 2024
-

 Lifestyle9 months ago
Abaya Fashion
-

 health/tips3 months ago
মনের নিয়ন্ত্রণ কি সঙ্গীর হাতে